Record the screen. The numbered steps come with it.
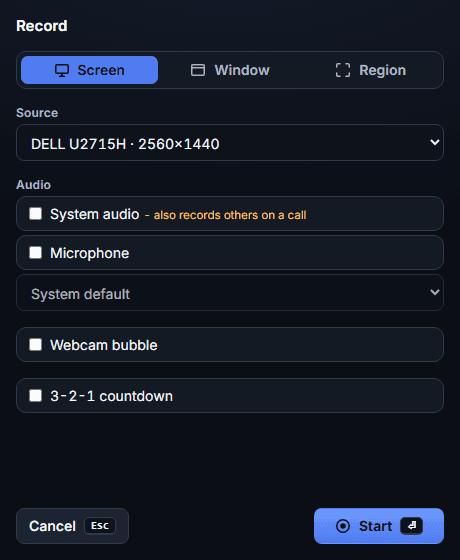
Screen recording on Windows, and the picker below is live. Turn on system audio, press Start, then try to throw the take away by accident.
Windows today. Want it on macOS? Get on the list.
Record
Start will record the whole screen, video only.
Nothing is captured. This is a replica of the panel, not a recorder.
The app also puts a webcam bubble toggle, a microphone device select and a Cancel button on this panel. None of the three can do its real job in a browser tab, so none of them is drawn here.
Record
A pill that
stays out of
the shot.
Timer, pause, webcam bubble and a hold-to-confirm discard, in one strip of chrome you drag wherever it is out of the way. The timer sits in a column sized for its widest reading, in tabular figures, so the buttons beside it hold still while the digits change. Paused turns the dot amber and stops it pulsing, so colour carries the state on its own for a reader who asked for less motion.
Trim by dragging two handles or by typing an exact time, with the kept length reading back as you go. The first answer is Save as a new card, which leaves the original take where it was. Replace original is offered second, and it is the one button on that bar that cannot be undone.
- Tabular timer
- Non-destructive trim
- Crash recovery
System audio and your microphone, on separate switches
Pick what to record: the whole screen, a single window, or a dragged region, from a list of what is open. System audio is one switch and the microphone is another, with its own device picker, so turning one on leaves the other where you left it.
Your source and your microphone are remembered per machine, so the second take starts set up like the first. Record at 30 frames a second, or 60 if you pick it before the take: the picker tells you what 60 costs, and both numbers are measured.
The warning is printed on the switch
System audio captures everything the machine is playing, which on a call is every other person on it. Their meeting app will not show a recording indicator, because the capture happens at the WASAPI layer, underneath anything a meeting client can observe. So the people on that call are positively assured nobody is recording, at the moment somebody is.
That is a fact about how Windows works, and no amount of interface design makes it go away. What interface design can do is put it in front of the person who is about to cause it. The sentence is on the toggle that turns system audio on, not in a settings page, not in a help article, and not in a tooltip you have to go looking for.
On the label, always visible:
System audio - also records others on a call
And the control’s full title, in the words it ships with:
Captures everything this machine plays. On a call that includes everyone else's voice, and their meeting app will NOT show a recording indicator. In many countries and US states, recording someone without telling them is a criminal offence - tell them first.
This warning is on a do-not-delete list in the code, so no future redesign can quietly tidy it into a tooltip. A legal warning you have to hover to find was written for the people who wrote it.
Discard waits six hundred milliseconds for you to mean it
Stop keeps the take. Discard destroys it, and there is no recycle bin to fish it back out of, so the button asks to be held for about six hundred milliseconds. From the keyboard it takes two presses inside three seconds.
Space pauses, and only while the pill has focus, so a space typed into whatever you are recording goes where you sent it. Escape is deliberately inert: one stray keypress shouldn’t end a take.
Both guards run in the pill at the top of this page. Hold its Discard and watch the fill. Let go early and your take is still there.

The app goes down. The take comes back.
If the app is interrupted mid-recording, the take is rescued and lands on the board with a Recovered badge and a duration of 0:00. The file plays fine. Nothing at recovery time knew how long it was, so the badge tells you that instead of inventing a number:
Rescued after the app was interrupted. The file is playable; its length was not recorded, so its duration reads 0:00.
Recovered and Trimmed live on the card as data, not decoration. Back the library up, restore it on a new machine, and the card still says where it came from.
Trim writes a new card and leaves your original alone
0:04.5 → 0:38.0 (0:33.5 of 1:24.0)
An exact time in either field: 4.5, 1:02.5 or 62.5. Arrow keys move a handle by a tenth of a second.
Preview, GIF, Annotate here and Burn in sit on the same bar in the app.
Two handles you can drag or arrow through, two fields that take an exact time, a live readout, and Preview. Confirm, and the first answer is the safe one: save the trim as a new card and leave the take you recorded alone.
Replacing the original is offered second, and it is the only button on that bar you cannot undo.
Annotations and markers travel with the footage. A mark that sat nine seconds in is still on the same frame afterwards.
GIF export sits on the same bar. So does Burn in, which writes a separate annotated MP4 with the shapes and effects baked in, and leaves your original untouched.
That is what Burn in is for. On a recording, redact, grey out, blur and pixelate are drawn over the film rather than into it, so the file underneath still holds everything they cover. Burn in is the step that changes the pixels, and the markdown export tells you which of the two you have.
Your clicks become numbered steps. Your keystrokes never do.
The recorder writes a track beside the video while the take runs: mouse positions, clicks and window focus changes. There are no keystrokes in it, not the characters and not the key codes, and no window titles. That is a decision, and a test in the recorder holds it there.
That track writes the Steps to reproduce section of the card’s markdown, and it stops at twenty five steps.
Nothing above involves a model. The recorder writes a list of positions and times to disk, and the export reads it back and numbers it.
AI · coming soon
One recording in.
Numbered steps out.
Every click will become a step: a full resolution frame, a caption written for you, and the cursor already circled where it landed. You will hand the result to somebody who has to follow it rather than a video they have to scrub.
- Every click in the interaction track will bring its own frame and caption
- The steps will export as a document, or stay as a walkthrough
- Frames will be stills, so a redaction will remove the pixels it covers
Every take is a file in your own folder
The recorder ships in the desktop app, with the library, the trim bar and the markdown export around it. Support teams record the fault once and send the take, instead of writing a paragraph about it.
Windows today. Want it on macOS? Get on the list.
Uploading one is the Sharing switch in Settings, and it ships off. The privacy notice lists everything that leaves your computer, item by item.